
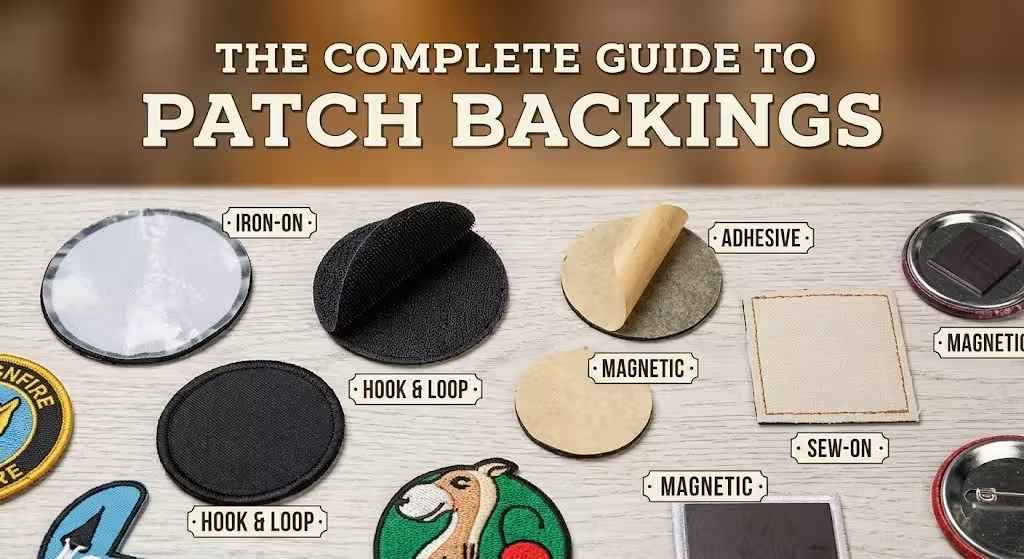
the complete guide to patch backings.
Picking the right patch backing is just as important as the design on the front. you can have the best-looking patch in the world, but if you choose the wrong backing, it will either fall off in the wash, sag on your shirt, or completely ruin your jacket.
A patch backing is the material applied to the reverse side of your patch. it determines how the patch attaches to your clothing or gear. some backings use heat and glue, some use a needle and thread, and others use simple stickers or velcro.
This guide will walk you through every option in plain english. we will explain exactly how each backing works, what fabrics they belong on, and what fabrics you should avoid at all costs. by the end of this guide, you will know exactly what to order so your patches stay exactly where you put them.
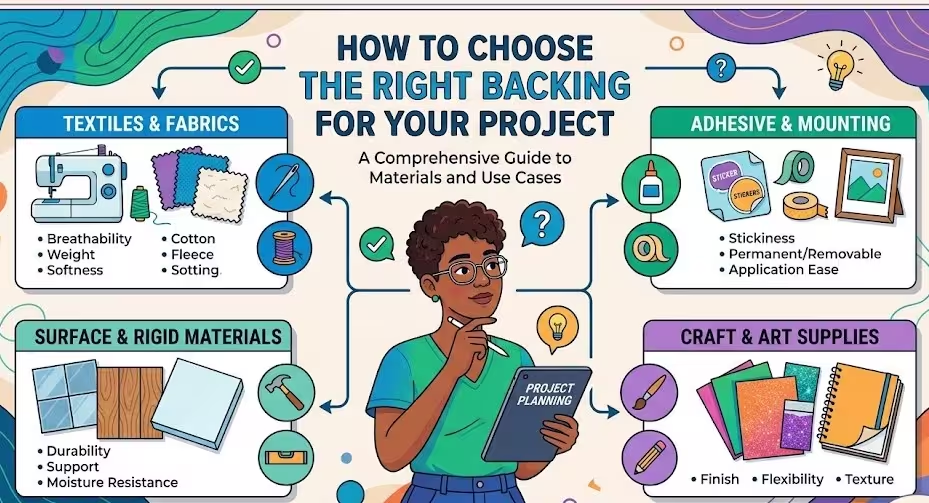
how to choose the right backing for your project.
before you look at the different types of backings, you need to answer three simple questions about how you plan to use your patches. your answers will make the choice obvious.
keep your answers in mind as you read through the options below.
first, what fabric are you putting the patch on? this is the most important question. heavy fabrics like denim and thick cotton can handle high heat and heavy needles. thin fabrics like running shirts or medical scrubs will tear or melt if you treat them the same way. leather requires a completely different approach because heat will permanently damage it.
second, does the item need to be washed often? a patch going on a backpack might never see the inside of a washing machine. a patch going on a restaurant uniform will be washed in hot water multiple times a week. water, detergent, and the heat of a dryer will destroy certain adhesives quickly, which is the main reason why cheap iron-on patches peel off.
third, do you need to remove the patch later? sometimes a patch is permanent, like a company logo on a uniform. other times, you might want to swap patches out depending on the day, or remove the patch before washing the garment.
keep your answers in mind as you read through the options below.

iron-on (heat press) backing.
iron-on backing is one of the most popular choices because it is fast and does not require any sewing skills. when you look at the back of an iron-on patch, it looks smooth and shiny. this is a layer of dry, solid glue.
to attach the patch, you place it on your clothing and apply heat. the heat melts the solid glue, turning it into a liquid that sinks into the fibers of your shirt or jacket. as the glue cools down, it hardens again, creating a permanent bond between the patch and the fabric.
for the best results, this is done with a commercial heat press machine, which applies even heat and heavy pressure. you can use a standard home iron, but you have to press down very hard and make sure the iron is hot enough to melt the glue completely.
best used for:
iron-on backing is best used for cotton, denim, canvas, and standard uniform shirts. these fabrics are tough. they can easily handle the high heat required to melt the glue without burning or melting. this backing is great for hats, jeans, jackets, and everyday clothing that you want to customize quickly.
do not use on:
do not use iron-on backing on nylon, rain jackets, windbreakers, or stretchy athletic wear. the heat required to melt the patch glue is usually hot enough to melt these synthetic fabrics, leaving a hole in your jacket. you must also never use iron-on patches on fire-retardant gear. To stay safe, you must follow strict FR gear compliance and sew your patches on instead.
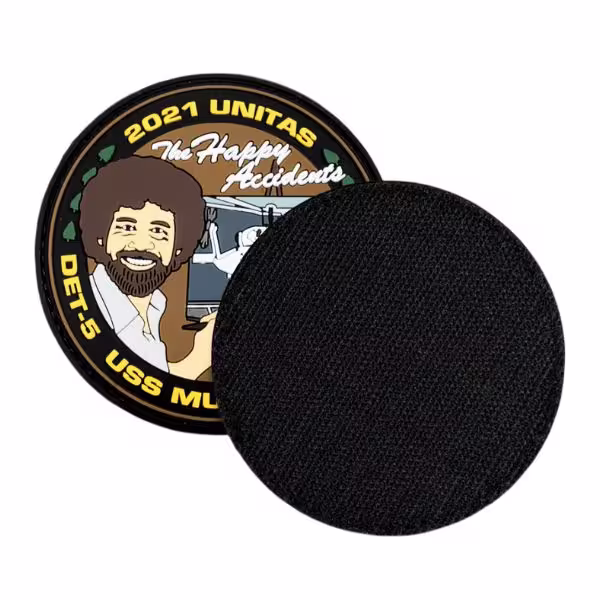
hook and loop (velcro) backing.
hook and loop backing is the best choice when you want your patches to be removable. it comes in two separate pieces.
the first piece is the “hook” side. this is the rough, scratchy side, and it is sewn directly onto the back of your patch at the factory. the second piece is the “loop” side. this is the soft, fuzzy side.
to use this backing, you take the soft loop side and sew it onto your clothing or bag. once the soft side is attached to your gear, you simply press the rough side of the patch against it. the hooks grab the loops, holding the patch firmly in place. when you want to remove it, you just pull it off.
best used for:
this backing is best used for tactical vests, police uniforms, and custom PVC patches on military gear and backpacks. and hats that already have the soft loop panels built into them. it is perfect for people who want to swap out morale patches, change name tags, or remove their patches before throwing their uniform in the washing machine.
do not use on:
do not use hook and loop backing on thin shirts, light polo shirts, or medical scrubs. For these lighter fabrics, custom woven patches are the best choice. the velcro material is thick and heavy. if you put it on a thin shirt, the weight of the patch will pull the fabric down, causing it to sag and look sloppy. additionally, the stiff edges of the velcro can scratch the wearer’s skin through thin fabric.
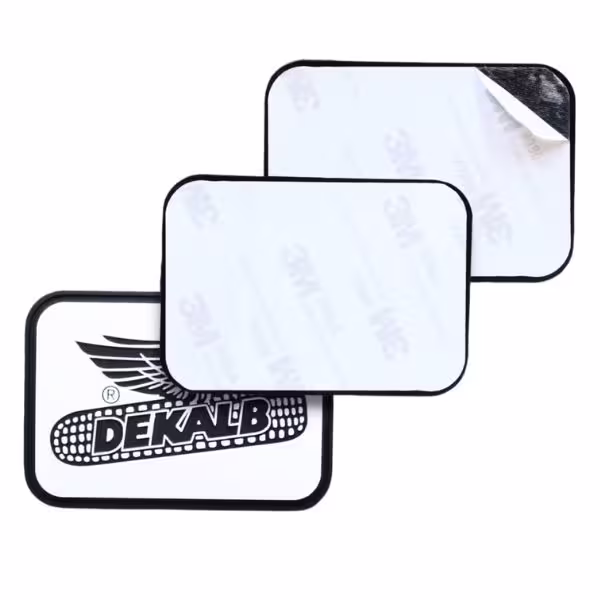
peel and stick (adhesive) backing.
peel and stick backing turns your patch into a heavy-duty sticker. the back of the patch is coated in a strong, sticky adhesive and covered with a piece of protective paper.
to use it, you simply peel the paper off the back and press the patch onto your surface. there is no heat required, and there is no sewing required. it is the easiest and fastest way to apply a patch.
however, it is very important to understand that peel and stick backing is not meant to be permanent on clothing. the glue is strong enough to stick to a shirt for a short period of time, but it will eventually lose its grip as the fabric moves and bends.
best used for:
peel and stick backing is best used for hard, smooth surfaces. it works perfectly on hard hats, construction helmets, laptops, metal toolboxes, and plastic equipment cases. it is also a great choice for one-day events, like trade shows or conventions, where you want to stick a temporary logo on a shirt and peel it off at the end of the day.
do not use on:
do not use peel and stick backing on clothes that will go in the washing machine. water and laundry detergent will immediately dissolve the sticker glue. the patch will fall off in the wash, and it will likely leave a sticky, messy residue on your clothing.
traditional sew-on (no backing).
traditional sew-on means the patch comes with no backing at all. the back of the patch is left bare, exposing the raw threads and the base fabric.
to attach this patch, you must use a needle and thread to sew around the entire edge of the patch, securing it to the garment. you can do this by hand with a needle, or you can use a sewing machine.
while it takes more time and effort than ironing or sticking, sewing is the most permanent and reliable way to attach a patch. it does not rely on glue, so you never have to worry about the patch peeling off in the heat or falling off in the wash. it also leaves the patch flexible, so it bends naturally with the clothing.
best used for:
sew-on patches are best used for custom leather patches on jackets and vests, as well as heavy workwear and anything that gets washed constantly. leather cannot be ironed because the heat will ruin the material, making sewing the only safe option. it is also the best choice for mechanic shirts or learning how to apply patches to Carhartt jackets that go through brutal, high-heat washing cycles.
do not use on:
do not use sew-on patches on waterproof gear, like raincoats or gore-tex jackets. when you sew a patch onto a jacket, the needle pokes hundreds of tiny holes through the fabric. this ruins the waterproof seal, and water will leak through those holes the next time you are in the rain.

plastic backing.
plastic backing is a little different from the others because it does not actually help you attach the patch to your clothing.
instead, a thin, stiff layer of clear plastic is glued to the back of the patch at the factory. this plastic layer acts like a skeleton for the patch. it makes the patch rigid and stiff. because the plastic has no adhesive on the outside, you still have to sew this patch onto your clothing using a needle and thread.
the purpose of the plastic is to keep the patch perfectly flat. when you sew a normal patch onto a jacket, the fabric can sometimes bunch up, wrinkle, or pucker. the plastic backing prevents this from happening.
best used for:
plastic backing is best used for very large patches, like the big logos that go on the back of motorcycle club vests or letterman jackets. these large patches are prone to folding or wrinkling over time, and the plastic backing keeps them looking crisp, flat, and professional for years.
factory tip: how to wash clothes with patches.
even if you choose the right backing, washing your clothes the wrong way can ruin your patches. here is the safest way to wash clothing that has patches attached to it.
first, always turn the shirt or jacket inside out before putting it in the washing machine. this protects the front of the patch from rubbing against the metal drum of the machine or snagging on zippers from other clothes.
second, wash the item in cold water. hot water can cause the colors in the patch threads to bleed, and it can weaken the glue on iron-on patches. use a mild detergent, and never use bleach, as bleach will destroy the colors instantly.
finally, the drying process is where most patches get ruined. you should always hang your clothes up and let them air dry. never put a shirt with an iron-on patch into a high-heat dryer. the heat of the dryer will do exactly what your iron did in the first place: it will melt the glue. when the glue melts in the dryer, the patch will peel off and stick to the inside of the machine or to your other clothes.
frequently asked questions (faq).
can i sew an iron-on patch?
yes, you can absolutely sew an iron-on patch, and it is actually the best way to apply one. many people use the heat of the iron to melt the glue and stick the patch in the exact right spot. once the patch is glued down and won’t move, they use a needle and thread to sew around the edges. this gives you the easy placement of an iron-on patch with the permanent security of a sew-on patch.
how long does iron-on glue last?
if an iron-on patch is applied correctly using a commercial heat press, the glue can last for years and survive many normal wash cycles. however, if you apply the patch using a standard home iron, it might not last as long. home irons often do not get hot enough, or people do not press down hard enough, meaning the glue never fully melts into the fabric. if applied poorly with a home iron, the edges may start to peel after a few washes.
what is the difference between velcro and hook and loop?
there is no physical difference between the two. “hook and loop” is the actual, generic name of the fastening material. “velcro” is simply a famous brand name made by a specific company. it is exactly like calling a tissue a “kleenex.” when you order a hook and loop backing, you are getting the exact same scratchy and fuzzy material that you are used to seeing on shoes and jackets.